
As you know, I’ve been trying to figure out what to do with some pumpkins for this year’s fall centerpiece. I ended up going all around the world and back again. Originally I wanted to do something with paint brush strokes… I envisioned some sort of color gradation– however- I realized that because the pumpkins have ridges, brush strokes weren’t going to look that great… so… I moved on from that idea. Then I was going to do something all in grays tones (which I still love the idea of, but maybe next year…) Then I had this idea for fluorescent yellow. Not sure where that came from- but all the neon pop that’s out there right now really grabbed me- So I thought, I’ll just grab some neon paint and paint the pumpkins! Well- I ended up getting some neon poster paint and applied a coat to a small pumpkin. FAIL.  The paint wasn’t really sticking like I thought it would, and it wasn’t very opaque. Basically it just looked gross. Like a big fat loogie on top. Bleah. So I figured maybe I needed to prime it- That’s when the ever trusted “spray paint bandits” took over– I primed the area I wanted to paint, and then used a coat of fluorescent yellow spray paint after, and finally the color really popped.
  Then I found some tan “camouflage” spray paint, which is described as “ultra matte” (and in reality, it’s ultra cool!), and did another one in the same way-
  I used some thin crepe paper drafting tape for the largest pumpkin, and just did a random pattern and sprayed the whole thing with white spray primer, then removed the tape- Voila! the 2009 pumpkin centerpiece!
 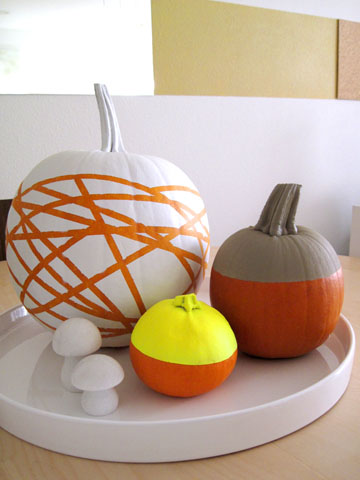 It’s probably a bit more “pop” than what you’d expect traditionally for “fall”- but then, I guess I’m not exactly the most “traditional” guy. (BTW, The mushrooms were these marble ones I got a few years back from a trip to Yucca Valley. ) Are any of you also doing something “non traditional” for your Fall decor?
